Search blog:

Entries from January 1, 2011 - January 31, 2011

Sunday
Jan302011

kitchen before and after

To say I was excited would be an understatement.

When we found the house we wanted to buy -- a quirky, light-filled beauty with a huge lot built in 1906, I immediately started dreaming about what she could become over the next twenty years.  I saw the gardening potential, the holiday meals, and the children who would grow to Everest-like heights and need every inch of the twelve-foot ceilings.

When we signed the adoption papers, I was giddy and teary. She was ours, forever and ever, amen.

The other night as I lay reading in bed, I remarked to my husband that if a 20 million dollar lottery ticket dropped in my lap tomorrow, I would not move out of this house. I would hire an architect to draw up plans for a wrap-around porch and an addition to the second story. I would hire a landscape designer to come at first thaw and take a backhoe to a huge chunk of our property. I would hire a team of contractors to get out here and put on the addition, upgrade the wiring, and put new siding on the house.

But I would not leave my baby, even though remodeling is probably more havoc-wreaking than moving to a newer place. This house is far from perfect, far, far from being done, but that is half the fun. 

To me, fixing up a house is just something you do. You keep some of the charm that money can't buy, like the weird fireplace in my unfinished basement (?!), the windows that are six feet tall and eight feet wide, and the knowing that your home has stood for more than a hundred years, rooted to this piece of earth near the biggest lake in the world.

I grew up in an old house, a house that was in a constant state of remodeling, so I'm used to it. When my dad ripped a hole in the wall to create an archway connecting the kitchen to the dining room, he found a couple of doors from the 1890s and some old clothes stuck inside.  That was fascinating to me. More than once I searched the closet under the stairs to make absolutely certain there was no secret passageway. (Did anyone else harbor the secret passageway fantasy? I still want a secret passageway.)

The person that we bought our house from did some work. They painted over everything, installed new cabinetry, cleared the overgrown shrubs from the yard, and put in a new furnace. Most things were not done the way I would want them (which is to say, done well), but then, little in the world is done the way I want it.

I'm working through my issues.

My kitchen used to look like this:


Things I liked:

1. The spaciousness.

2. The light.

3. The cleanliness.

Things I did not like:

1. Everything else.

While the cabinetry and appliances were new, they were builder's grade, and didn't really fit with the age and proportion of the space. The cabinets seemed too small in comparison to the height of the ceiling. The black countertops, white appliances, and tan ceramic tile did not create the charming, cohesive look I wanted. (Ceramic tiles in a cold climate are just a recipe for disaster. Not only are they chilly, they are extremely slippery when you come in with snow on your shoes.)

So, before we moved in, we did a little work on the joint. 

We were on a small budget. Much as I would have liked to spend $30,000 spiffing up the kitchen, the checkbook refused to cooperate.

But we were able to totally transform the look of the kitchen for less than $1,500.

Here's my kitchen today. I won't say she's finished, but she's headed in the right direction.

We painted the walls Benjamin Moore Grassy Meadows.

We installed beadboard and a chair rail around the entire room, and then painted both it and the top cupboards in Benjamin Moore's Ivory White.

Because it's cold and snowy here much of the year, I wanted the kitchen to have a warm feel, so I stayed away from a cool white.

The lower cabinets were painted Benjamin Moore's Gray Horse:

I opted for a semi-gloss finish throughout the kitchen, given that I have young children and a cat and a husband and a pet horse masquerading as a Chocolate Labrador, so the paint would not only need to be wipeable, but scrubbable.

We added satin nickel hardware to the cabinets, and put up crown moulding to give the upper cabinets a larger and more classic presence in the room. If I'd had a larger budget, I would have liked to have put small, glass-fronted cabinets on top of them, like these:
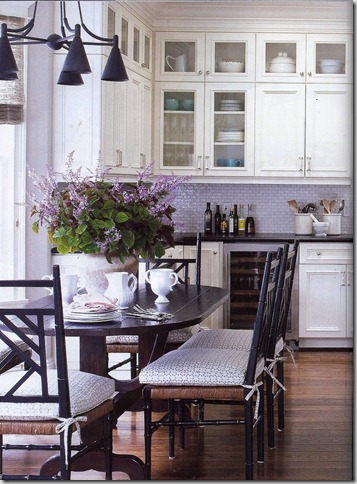
http://lh5.ggpht.com/_hUw_VQ5l9r0/S9QbJkL-DdI/AAAAAAAAHG4/ZZ28u5FYSbI/4358607739_07a68acf94_b1_thumb1.jpg

via Things That Inspire

Someday, someday.

We also bought a counter-height table that doubles as a breakfast bar/island and outfitted it with stools similar to these from Ballard Design:

I really, really hated the flooring. Someday we'll have hardwoods, but until then, we bought an indoor/outdoor rug that covers most of the tile and is easy to clean. (Also from Ballard.)

The Hoosier Cabinet was a lucky find at an antique store, and I adore everything about it. It fits like it was made for my kitchen, and I hope he'll be happy living here. My love for you, Mr. Hoosier, is steadfast. Unyielding. True blue.

I adore the kitchen now, but here's my list of things I hope to do soon.

1. New light fixtures, maybe something like this from Barn Light and Electric:

2. Window treatments. I haven't settled on what type.

3. Plants for the top of the Hoosier cabinet and a window box for the window over the sink.

4. An alternate arrangement for the trash and recycling. They kind of greet you at the back door now, and they're a big temptation for the horsedog.

5. Change some of the hardware on Mr. Hoosier.

Things that I'd like to do someday, perhaps after I win the lottery:

1. Swap out the appliances for stainless steel and install a gas line to the range. I love cooking with gas!

2. Install new flooring, preferrably hardwood.

3. Upgrade the wiring so that we can actually turn on the kitchen light from the back entry door. As it stands now, we have to walk through the dark kitchen to be able to flip on the light.

4. Create display shelving on the bare walls so I can enjoy my vintage tableware collection more.

5. Hire a robot to spotlessly clean the kitchen three times a day. She should be friendly and wear a white apron.

6. Put in sliding glass doors onto the brand new deck that we'll have built with our lottery winnings.

Kitchen before:

Kitchen after:

Perhaps I should actually start playing the lottery. It might be easier to win if I do.


Thursday
Jan272011

You know it's bad.

You know it's bad when you get emails from people saying, "PLEASE! Please update your blog! I need a fix!"

You know it's bad when your very own husband says, "So, do you have people emailing yet, asking you to update your blog? Because it's been a week."

You know it's bad when you get a bill from your web host for almost $6,000 because your website had over eight million page views during the month of January.

You know it's bad when your web host charges $6,000 for eight million page views, and that your shopping cart system is proprietary to them, so you're stuck with them unless you want to change shopping cart systems again.


But I have more pressing things to tell you. Things like:

1. My glasses are broken. I tried using super glue, and that solved one of the problems, but created another: now my glasses won't fold closed. It's a very chic thing, to have broken glasses. You should all go out and break your glasses right now, so that you can be as hip and fantastic as I.

2. We had a fantastic time at our workshop on Saturday. Darn Knit Anyway is a great yarn shop run by great people, and all of the attendees were so fantabulous.

They did not make fun of my hair, which was horrific because I got up at 5:00 am to wash it, and when I got to Stillwater, MN, I couldn't find a bathroom with an outlet so that I could do something with it. It was a big staticky mess, but you know what? We had fun anyway. So there. Bad hair will not ruin your life if you choose not to let it.

I'll have pictures to show you soon.

Of the workshop, not the hair.

3. Black licorice -- the real stuff, not the artificially flavored drugstore junk -- makes your tongue numb. I may or may not have discovered this today.

4. I am currently coveting something I cannot have. Or, something I will not allow myself to have, because it is entirely frivolous and very expensive, and even though I am a master at justifying expenditures, I cannot come up with a good reason for this one.

It could be this amazing turquoise and pink and green china.

Or it could not be.

Or it could be.

I'd ask you for help coming up with answers to justify the expense of bone china, but really, I have three kids and a giant horsedog, and by the time I saved up enough money to get place settings for all of us, the kids will be grown, and I'll be sitting old and alone in my dining room with just the newspaper, my husband, and some 30 year old china for company. But my husband would probably be too afraid to break the china, so he'd be eating on some plastic nonsense he bought for $.99 at Target.

5. I find it amusing that the place I used to live has had more snow than the place I live now. And the people in the place I used to live made fun of me for moving to this place because of the terrible winters. Ha. I see your snow and I raise you some horrible cold!

6. My firstborn child is almost five feet tall. He wears a men's size nine shoe. He is eight. Something is wrong with this picture.

Oh wait, I found the problem. It's the genetic code of his two giant parents! Whew!

I will be a better blogger from here on out. Girl Scout's honor.

Related Posts Plugin for WordPress, Blogger...

Thursday
Jan202011

Yarn wreath tutorial!

If you're anything like me, you're always looking for fun ways to make use of the yarn you've accumulated over the years.

Not that I've accumulated that much yarn, really. Just enough to make sure that my children, grandchildren, and great grandchildren have an unending supply of hand dyed goodies.

I can just see my children reading my last will and testament, in which I bequeath them each 1/3 of my stash instead of cash. What a pleasant thought. For me.

Maybe our new staff T-shirts should say:

STASH IS BETTER THAN CASH!

in big giant letters. I think everyone will go for it. I mean, who wants to get paid money when they could get paid in yarny awesomeness?

But I digress.

Look at these fun wreaths my sister and I just made for Valentine's Day:

We had so much fun, we ended up making four wreaths, and now I'm going to show you how to make them too! Yay!

Here's what you'll need:

  • Some yarn. Any color you want. The amount you'll use is dependent on the size of the wreath -- a big wreath will take about 150 yards of Aran weight yarn. A small wreath will take less than 100.
  • A pair of scissors.
  • A hot glue gun.
  • A naked straw wreath, any size that you prefer.
  • Pieces of felt. You can get a couple of flowers out of one sheet of craft felt. You could certainly use wool felt, if you like, but I bought recycled craft felt at a big box store.
  • Optional: Fabric scraps, buttons, glitter, and scrapbooking paper to snazz things up.

I'm in love with these dressmaker's shears I bought at Bobbin's Nest Studio. Where have you been all my life, shears? You cut like buttah.

 We found it best to leave the plastic on the straw wreath -- it makes them easier to wrap with yarn when you don't have little pieces of straw poking out all over. You could also wrap yours in plastic wrap if need be.

Do you know how to wind a ball of yarn by hand? A lot of people don't, so I'm going to show you. If you already know how, you can skip the next couple of pictures.

Lay out our skein of yarn and snip the ties carefully.

If you don't have a swift, just use the backs of two chairs.

I don't have a swift at home.

Does that shock you?

Ready to fall dead on the floor?

I like winding yarn by hand.

I own a nice ball winder, and I hardly ever use it, because winding them by hand is kind of fun.

Hello?

Now you're ready to get your sister with the French manicure to demonstrate yarn winding. Wrap it maybe 20 times around two fingers.

 Then tell her to take it off her fingers and start wrapping it around the yarn in the opposite direction.

Then, because you're so much faster at winding yarn balls than your sister is, snatch the ball of yarn away from her and wind it yourself.

(Note: It is very important that you snatch the ball of yarn from your sister. It helps if you couple it with a phrase like, "Gimme that!" or, "What are you DOING?")

Marvel at your decidedly less manicured fingernails.

Tie the ball of yarn to your wreath. I'm using some undyed Lindon Merino here. You can use anything, really -- the thicker the yarn, the faster the wreath will get covered. If you want to use sock yarn, you could wind several small balls and hold the yarn double or triple.

 Wind the yarn five or so times around the wreath. I found it was fastest to hold the wreath like this with my knees and to pass the yarn through the center with two hands.

 After you've wrapped it about five times, scoot the yarn up so the strands touch each other. I also found this to be faster than trying to line up each strand perfectly one at a time.

Keep repeating this until your wreath is mostly covered. The you can go back and fill in any thin areas.

Keep in mind that this doesn't need to look perfect. The wreath is probably even more charming with a little imperfection.

 You can also layer more than one type of yarn for texture and depth. Once I wrapped my wreath in Lindon, I added some Deliciousness (a superfine alpaca with a lovely texture) over the top.

 When you're satisfied with how it looks, snip the yarn and tuck the end in behind other strands on the back of the wreath.  You could also add a dab of hot glue to secure the end of the yarn.

Now we're ready to decorate!

Cut yourself a square of felt. The bigger the square, the bigger the flower it will make. It doesn't need to be a perfect square. Imperfection is beautiful, remember?

Snip the corners of the square to make a circle(ish) shape. If it made you happy, you could trace around a bowl or glass and cut out a perfect circle. But this is faster, and the end result is no less pretty.

Now cut the circle into a spiral shape. You could trace it, if you wanted, or you could freehand it, like I'm doing.

When you're done with your spiral, you start reshaping your felt into a flower.

 Start rolling the spiral of felt so that each layer is behind the next, like this:

 Keep going until you're out of felt.

Then add a dab of hot glue to the end to secure it.

See how purty she is? I recommend making all your flowers and decorations first and affixing them in a pleasing way once you can see how everything will come together.

I love the way these look together.

The thinner you cut the spiral, the more petals you'll have to wrap. Notice how it's not cut perfectly.

And repeat after me: That's OK, because imperfections are beautiful.

Here's an example of a spiral I cut with a wavy line. It gives the finished petals a pretty shape.

All imperfect, all beautiful.

Now it's time to add embellishments, if you like. We glued some small buttons to the center of a few of our flowers, for added snazzle.

We experimented with other shapes and techniques, like layered hearts, and snipping some of the petals to appear fringe-y, like the purple flower in this picture. We cut some leaves out of glittered scrapbooking paper, and we rolled a few small balls of yarn from scraps to add to the wreaths.

Arrange your snazzles so they look good to you, and hot glue them on. (FYI: Since snazzle is a word I just made up five minutes ago, feel free to use it as an adjective, a verb, a noun, whatever. I give you permission.)

I like the layered flowers on this one. The yarn is wrapped in Cara on Springvale.

See the sparkly leaves and the small balls of yarn? This is Clare on Lindon Merino. It looks pretty on my library door!

And if you have some handpainted yarn with repeating segments of color, this is a fun way to show it off! Tara on Lindon Merino here:

I hung these in my kitchen, and I love the way the pale green looks with the red, purple, pink, and blue.

Your turn! Make some Valentine's yarn wreaths, and be sure and send me a picture! Happy Valentine's Day to you!

Monday
Jan172011

Last time I was there

The last time I was at Darn Knit Anyway, it was a sultry day in Minnesota. The humidity was killer. My face was glistening shortly after stepping out of my air conditioned car.

My guess is that Stillwater, MN in January is just a teensy bit cooler in January than it is in July.

But that doesn't mean we won't have a great time -- in fact, all the more reason to pile on your handknits and join us this Saturday (January 22nd) for our new workshop on yarn substitutions.

This is one of the topics that I get asked about all the time.  People want to know, "Will this yarn work with this pattern?" or, "I really want to make this one-eyed, one-horned, giant purple people eater -- will I get gauge with Springvale DK?"

Intrepid readers, I propose a new motto.

No longer will we be shackled by the constraints of our patterns!

We shall make yarn substitutions with confidence!

We'll knit our projects with any darn yarn we want!

And we'll be happy about it!

I invite you to join me this Saturday, January 22nd, at Darn Knit Anyway in Stillwater, MN.  The workshop is from 1-4pm, with a trunk show to follow from 4-6.

Registration for the workshop is very limited, so please call or email Darn Knit Anyway soon. The trunk show is free and open to all, but workshop registrants get first pick of the nifty Carpe Yarnem (never to be repeated) colorways. Darn Knit Anyway can be reached via telephone at 651.342.1386, or via email at info@darnknitanyway.com.

Bring your patterns, and we'll find some great yarn possibilities amidst Darn Knit Anyway's sizable selection -- we'll get in lots of hands-on practice, ensuring you can apply what you learn to your knitting every day.

T-minus five days! Who's up for a road trip this weekend?

Tuesday
Jan112011

A pictoral tutorial

Or is that pictorial tutorial?

Today, I bring you a tutorial on how to to block your knitting. Blocking is washing or steaming your garment so everything lays as it should. Your knitting will look at least 50% better after blocking.

Blocking is very, very important. If you do not properly block your garments, the knitting police will revoke your knitting permit and gouge your eyes out with Susan Bates Circular Needles.

Question: Will blocking my sweater make me look like Cindy Crawford?

Answer: No, only genes and plastic surgery can do that.


Question: Will blocking my hat keep me from looking like a homeless person?

Answer: Possibly.


Question: Will blocking make my brown eyes blue?

Answer: Yes, if you also wear colored contacts while blocking.


Question: Will blocking make my knitting look utterly sublime?

Answer: Most definitely.


Step One: Knit something. Block it. Admire your handiwork.

Step two: Knit an identical thing from a different colorway. Don't block it.

Step three: do a foot-to-foot comparison of the blocked vs. the unblocked thing.

Step four. Call the knitting police and turn yourself in. Speak with the district attorney and make arrangements to get on their home monitoring program until all of your knits are well and truly blocked.

Step five. Knit something else, like a Hollygrove Hat. Check in with your probation officer and confirm your plans to block the item in a timely fashion once knitting is complete.

Step six. Give the item a bath. Tepid water, a little wool wash or mild hair shampoo. Soak for 10-20 minutes.

Step seven: *GENTLY squeeze out the extra water from your garment. *GINGERLY place the item in a mesh bag. A pillowcase will also work.

Step eight: *TENDERLY place the bag at the bottom of your washing machine. This will also work with a front loader. I've done it myself with two separate models and it works fine. Don't lie to me.

If you're using a top loader like we have in the studio, it might help to place some clean but linty towels opposite the bag you've so *DELICATELY placed at the bottom of the washer. This will help keep the washing machine from ka-thunking across the floor with its unbalanced load.

Step nine. Turn your washing machine to **SPIN CYCLE ONLY. Stand there and listen to make sure you don't hear water entering the machine. If you hear water, stop it immediately and move the control somewhere else, randomly, willy-nilly, until you do NOT hear water entering the machine.

If you don't have a washing machine, use a salad spinner to get the excess water out.

If you don't have a salad spinner, go outside and swing your arm around and around 5,000 times to get the extra water out via centrifugal force.

Step 10: Stop judging me for my dye splotched washing machine. My washer at home is much cleaner, OK? I work with dyes all day, OK? I don't have time to scrub my hands with surgical precision fifty times a day, OK?

OK?

Step 11: While the garment is being spun out, prepare the high-tech hat drying apparatus. It is ***VERY IMPORTANT that you buy Happy Birthday balloons for this project. Balloons that say anything other than Happy Birthday (or worse, say nothing at all) are completely unacceptable.

Step 12: Inflate balloon to desired size. It's useful to measure the recipient's head before doing this. If that's not possible, ask yourself the following questions:

1. Self, does the recipient of my hat have a big head or a small head?

2. Self, does the recipient of my hat have a bigger or a smaller head than me?

3. Self, what is the circumference of our head?

****Then somehow use the information you glean from the answers to questions 1-3 to guesstimate how big the recipient's head is.

I guesstimated that the recipient of my hat is 6'5", and thus he must have a bigger head than people who are average height.

I guesstimated that I bore thirty pounds of the recipient's children and can personally attest that the children all had heads that were bigger than the average baby.

Thus, I guesstimated that the recipient had a head circumference of 25ish inches.

Step 13: place high-tech blocking apparatus in a bowl to hold it upright.

Step 14: *CAREFULLY remove the hat from the spin cycle of the washing machine. It should now be just damp and not dripping water all over the place.

Step 15: Place hat on high-tech blocking apparatus and arrange as desired.

HELLO? It already looks way better, and it's not even dry yet.

Step 16: Leave high-tech blocking apparatus alone for a while, until the hat dries completely. This could take anywhere from 12-48 hours.

I did not take pictures of the high-tech blocking apparatus sitting alone for 48 hours, but this is pretty much what it would look like:

Step 17: When the hat is dry, remove it from blocking apparatus for photographing. Any knitter will tell you that it's important to photograph your projects immediately after blocking, because they'll probably never look this good again. *****Also, it's good evidence for your probation officer to demonstrate that you are complying with the terms of your probation.

Step 18: Pose the hat so it looks adorable.

Step 19: Take at least one more artsy photo of your garment for auld lang syne:

And there you have it: a pictor(i)al tutorial, proof positive on the importance of blocking.

Before:

After:

*By gently, gingerly, tenderly, delicately, and carefully, I mean toss it in any old way at all. It's a hat, not an egg.

** By Spin Cycle Only, I mean Spin Cycle Only.

*** By very important, I mean not important at all.

**** By somehow use the information, I mean figure it out on your own. It's 12:50 am here and there's a dog, a cat, and a three year old asleep on me. I can hardly move my arms.

***** Once a law teacher, always a law teacher.

Project stats: Hollygrove Hat, designed by Judy Kaethler.
Yarn: Roslea Organic Chunky
Needles: Size US 3. I wanted the hat to be super dense so the recipient would have warm ears during his four hour shifts flooding the neighborhood hockey rink.
Colorway: Mine
Pattern modifications: I worked an extra 3" of ribbing at the bottom so the brim could be folded up and provide a double layer of warmth over the ears. I knit the size small to account for my larger gauge, and then did two extra repeats of the cable pattern before decreasing for the crown shaping. It fits (and works) beautifully. The pattern was superb. Easy to understand and memorize. A nifty weekend project, and a great foray into cables!
Related Posts Plugin for WordPress, Blogger...